Wednesday, May 28, 2014

Alphabet Series - Preparing the canvases


I love combining different patterns and colors. I could be totally addicted to buying fabrics and scrapbook papers even if I don't quilt or scrapbook. This made choosing the papers for the backgrounds of the series both extremely fun and extremely difficult. (I kept getting distracted by beautiful papers that had nothing to do with this project!) Anyway, I mostly kept myself on track and have finished covering all but 4 of my alphabet canvases.

Materials:


Canvas: 
I like the presence of a canvas that stands further off the wall, so I went with an 8" x 8" gallery canvas with a 1 1/2" depth. I ordered canvases form Dick Blick. Because I was ordering 30 (26 letters, 2 more to make an even grid and a few in case of mistakes) I was able to get a nice price per canvas.

Papers: handmade, scrapbook, tissue
After choosing the cities and symbols, I thought about what color and pattern might best show off the symbol or further represent the city/country. I ended up with a few kinds of papers - lotka papers, Japanese papers and scrapbook paper.

Glue:
I decided to use PVA bookbinding glue to adhere my papers to the canvases. Mine is from Paper Source. It is ph neutral, flexible and allowed for some repositioning. The best part is it easily cleans up with water. (Clean off the rim and the lid of the jar after each use so it will easily open the next time you want to use it.)

Brush:
I used a number 10 bristle brush to apply the glue to the back of the papers (except in the case of the tissue paper when it was applied to the canvas).

Ruler: 
In addition to measuring, I used the ruler as a straight edge to tear the handmade papers against.

Paper cutter / trimmer
Wax paper or other surface protection

Process:

1) I started by measuring out my paper and cutting it to size. Being an artsy person, I did not bother with actual measuring so much as ensuring I had enough paper to cover the canvas - much in the way I measure wrapping paper for a present. I laid the canvas on the paper, giving it enough buffer to cover the sides. Since my handmade papers were flat sheets 20" x 30" I placed a ruler along the line where I wanted to cut, and tore the paper along the straight edge of the ruler. For my 12" x 12" scrapbook papers, I trimmed off a 1/2" of length and 1/2" of width (making it 11 1/2" x 11 1/2") to get rid of some of the excess.


2) I placed the paper face down in front of me and brushed on 2-3 inches of glue at one end of the paper. Right now, it does not matter which direction the paper is facing - I can rotate the canvas later as needed.

These 2-3 inches are enough to get the paper stuck to the canvas.


3) I lined up the glued edge of the paper with one side of the canvas. I also left about 1/4" to wrap over to the back edge of the canvas. I a couple of cases, I had placed the paper such that the right or left side was a bit short to completely cover when folded over - no problem, I carefully peeled the paper up and readjusted. The I smoothed out the side panel and folded the paper over to the front. Note: some papers stretch more than others and take the moisture of the glue better than others. This will affect the appearance of "wrinkles" and "bubbles." I found that the higher quality papers (lotka and Japanese) took the glue better and created a better final surface.


4) I continued applying glue to the back of the paper in 2" sections by lifting it up and lightly brushing the paper. I smoothed it out after each section, pressing it to the canvas.


5) After working all the way across the front surface, I moved to the sides. I applied glue to the corners and folded them flat against the side of the canvas. Then I applied glue to the remaining flap and pressed it flat against the side of the canvas, similar to wrapping a present.


Here is a finished canvas. This one was covered in scrapbook paper, and you can see some "bubbles." Since I am painting over portions of this surface, I am not worried about the bubbles being obvious later.

The next step is drawing the outlines on the canvases and painting out the shapes with white. This will give me a "blank" canvas on which to paint my symbols.

Sunday, May 25, 2014

Alphabet Series - Pt. 2

Here are the remaining sketches for the second half of the alphabet. And today I had a blast picking out some of the fabulous papers that will create the backgrounds, so now it is time to start on the canvases. (As with any art project, this is the scary part - when the loose sketches and ideas begin to take "final" form. But it is only paper, paint and canvas, and I can always get more if I "mess up," so push the fear aside and go for it!)


Tuesday, May 20, 2014

Alphabet Series - Pt. 1

With the baby coming, I thought "Why buy art when I can make it?" (Though, I often think that and it doesn't usually happen that I actual make the said item I decide not to buy because I figure I can just make it.)  That is what I am doing (hopefully!). I was hesitant to create too much of a theme in the room, which means no mural on the wall, and I want whatever ends up in the room to look like it belongs. I decided on creating an alphabet series. Since Scott and I love to travel, and I would love to inspire the baby to explore and be interested in the world, I decided on a world travel theme for the series. I also think that this will pull in a variety of colors, shapes, animals, etc. that I can play off of throughout the room. I plan to create 8" x 8" mixed media collages - collage paper on the background and paint on top. The canvases have arrived, and so far I have completed sketches for almost half of the alphabet.


As I was sketching, I realized that in some ways, this is turning out to be a study of the development of the dome through out history and across cultures. I have done 12 letters and already have 5 different domes! Thanks to all my art history teachers, starting with Georgia McCalmon at Elkins HS for including architectural history.


Here is the alphabet list:

A - Agra, India (Taj Mahal and peacock)
B - Bangkok, Thailand (elephant and temple)
C - Cuzco, Peru (Machu Picchu and llama)
D - Dublin, Ireland (round tower, shamrock and celtic designs)
E - Edinburgh, Scotland (Edinburgh castle and thistle)
      ...okay, I know it is technically the UK, but they really want to be independent, so...
F - Florence, Italy (Duomo)
G - Giza, Egypt (pyramids and sphinx)
H - Haarlem, Netherlands (windmill and tulips)
I - Istanbul, Turkey (Hagia Sophia)
J - Jerusalem, Israel (Dome of the Rock)
K - Kathmandu, Nepal (Boudhanath Stupa)
L - London, England (red double decker bus and Big Ben)
M - Mexico City, Mexico (Teotihuacan temples)
N - Nairobi, Kenya (lion and giraffe)
O - Oslo, Norway (Viking ship)
P - Paris, France (Eiffel Tower)
Q - Quebec City, Canada (fortifications)
R - Rio de Janeiro, Brazil (Carnival)
S - Sydney, Australia (Sydney Opera House and kangaroo)
T - Tokyo, Japan (pagoda)
U - Ulaanbaatar, Mongolia (yak and yurt)
V - Venice, Italy (gondolier)
W - Warsaw, Poland (art deco designs and Marie Curie)
X - Xian, China (Terra Cotta Warrior and panda)
Y - Yangon, Myanmar or Yaounde, Cameroon (I have no idea yet.)
Z - Zurich, Switzerland (mountain and skier)

Wednesday, May 14, 2014

Recipe Book Illustrations

So here are the final illustrations for Sarah's recipe book.  The plan is to print them on card stock and add tabs for the interior illustrations. I am so happy with the way they turned out. In fact, I like the "entree" illustration so much I am thinking about printing it to hang in my kitchen!

cover
dips, sauces, salsas
appetizers
breads
soups and salads
entrees
vegetables
desserts

Tuesday, May 6, 2014

New Projects Percolating...

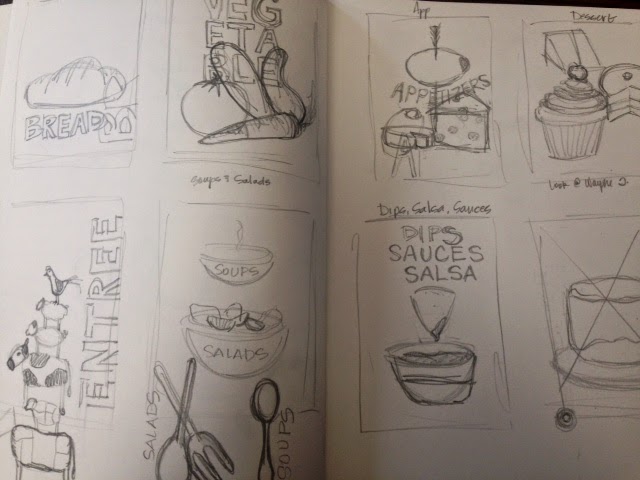
It has been a couple of weeks since I have added anything here, but projects have been percolating in my brain. My sis Sarah is a great cook and loves to try out new recipes on Scott and I (to which we never object - it is like eating out for free!) She is always collecting recipes from different sources, and she actually prints them out - unlike me who just looks them up online, makes them, and then can never find the recipe again when I want to make that delicious dish we tried three weeks ago. (Yes, Krystal W., I have started adding them to Evernote.) Anyhoo, she has a binder that she keeps them all in, but to be frank, it is kind of utilitarian (yes, that is nice for ugly). After all, she is the accountant, and I am the artist, so our needs differ - she cares about the actual recipes, I care how the collection looks. So when I mentioned something, she of course suggested that since I am the one with free time right now, I could design something for her. So here is a sneak peek some of the preliminary sketches for the section title pages:


As this is still in the initial planing stage, these could change drastically, but right now the plan is to create them in black and white - maybe with a hint toward the look of a print, but we will see what happens. That's the beauty of creative projects - I can have a plan, but somewhere along the way, if I am letting the spirit of creativity guide me, the project morphs into something different and often better.

The other project that is still percolating in the back of my brain is art for the baby's room. Right now I am thinking of doing an alphabet series, but I am having trouble deciding on one theme. I want something fun, inspiring, bright, playful, and of course gender neutral. The one I am leaning towards right now is "travel" and doing a different country for each letter. But I could use your help - if you have ideas for themes or for countries I could include in the travel them, please let me know. With about 20 weeks left, and the cookbook to finish first, My timeline will have to be a couple a week to get all 26 finished and framed before the baby gets here.